- Vancouver 360-369-3586
- Portland 503-925-3504

Leaky Outdoor Faucets: Post-Winter Hose Bib Diagnostics for the Pacific Northwest
by writer | May 05, 2026
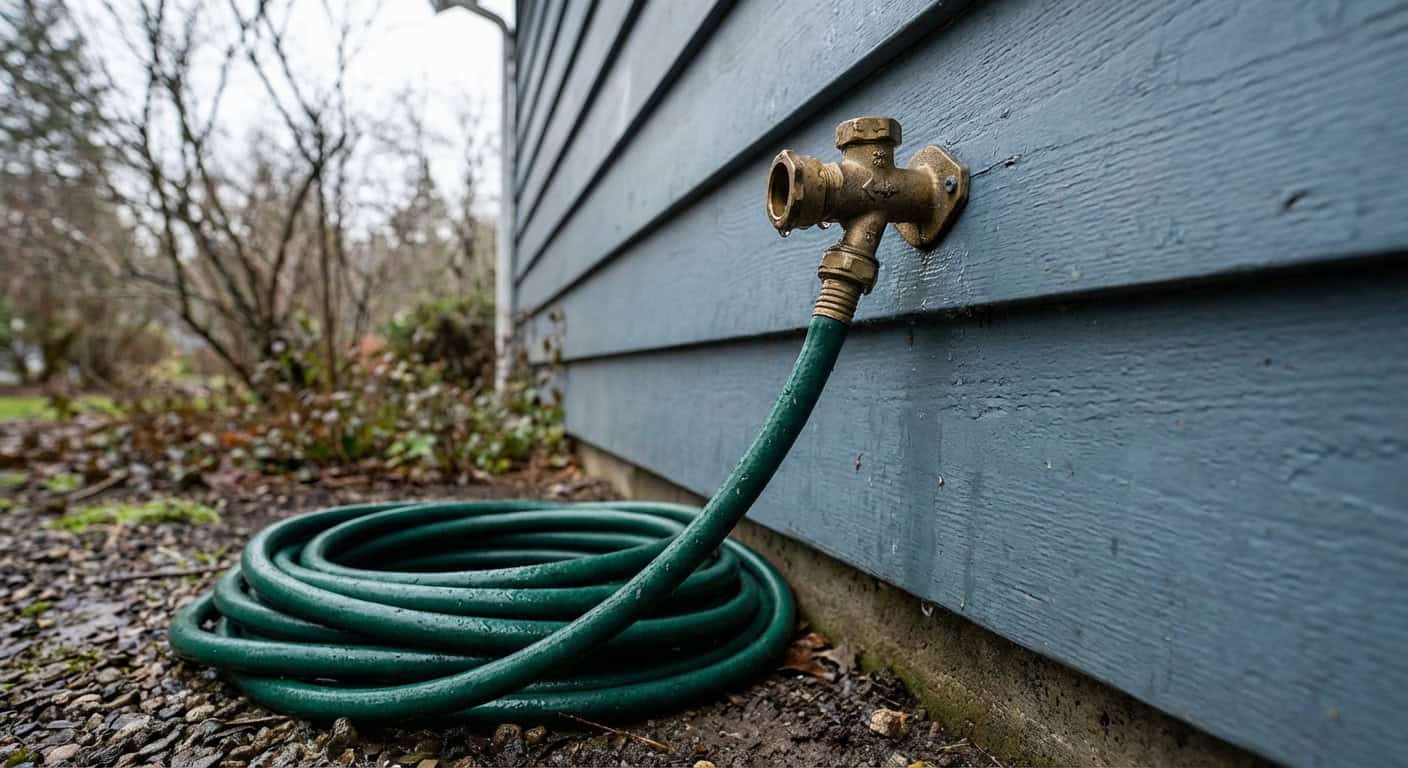
Table of Contents
- Why Your Outdoor Faucet Can Leak for Months Without You Knowing
- Why Portland & Vancouver Homeowners Face Unique Freeze-Thaw Risks
- How to Spot a Hidden Hose Bib Leak Before It Causes Thousands in Damage
- When DIY Detection Isn’t Enough: Advanced Leak Detection Methods
- From $200 Repair to $8,000 Disaster: Why Early Detection Matters
- Your Spring Outdoor Faucet Maintenance Checklist (5 Minutes Can Save Thousands)
- Key Takeaways
Spring has arrived in the Pacific Northwest, and with it comes the urge to reconnect garden hoses, water thirsty lawns, and prepare outdoor spaces for the warmer months ahead. But before you turn on that outdoor faucet for the first time since fall, there’s a hidden danger lurking behind your exterior walls that could cost you thousands of dollars in structural damage. Unlike burst pipes that flood your basement immediately, a failed frost-free hose bib leaks silently inside your wall cavity for weeks or months before you discover the damage. The Portland and Vancouver area’s unpredictable “false springs” followed by sudden Arctic blasts create perfect conditions for these insidious ruptures. In January 2024, the region experienced severe ice storms with wind chills in the single digits, setting the stage for widespread residential plumbing failures. Here’s the shocking reality: A ruptured hose bib can dump up to 5 gallons of water per minute directly into your wall, saturating insulation, rotting structural wood, and creating ideal conditions for toxic black mold—all while you’re completely unaware. The EPA estimates that 10% of homes have leaks wasting 90+ gallons daily, but hidden hose bib failures are particularly devastating because they remain undetected until catastrophic damage has already occurred. Spring gardening season triggers these hidden leaks when homeowners turn on outdoor faucets for the first time since fall. In this guide, you’ll learn how to identify if your outdoor faucet is leaking behind your siding, what causes these failures, DIY diagnostic tests you can perform today, and when to call Sarkinen Plumbing’s professional leak detection services. Take five minutes now to protect your home from becoming another post-winter plumbing disaster statistic.
Why Your Outdoor Faucet Can Leak for Months Without You Knowing
Understanding how frost-free hose bibs work—and fail—is essential to recognizing why these leaks are so dangerously deceptive. Unlike standard outdoor faucets that place the shut-off valve directly at the exterior wall, frost-free hose bibs (also called sillcocks) feature an elongated stem measuring 8 to 14 inches long. This engineering design places the actual shut-off valve deep inside your home’s heated space, not at the exterior wall where freezing temperatures pose a threat. When properly shut off, gravity drains water from the outdoor portion of the pipe, leaving the exterior stem empty and immune to freezing. It’s an elegant solution to a common problem—under normal conditions.
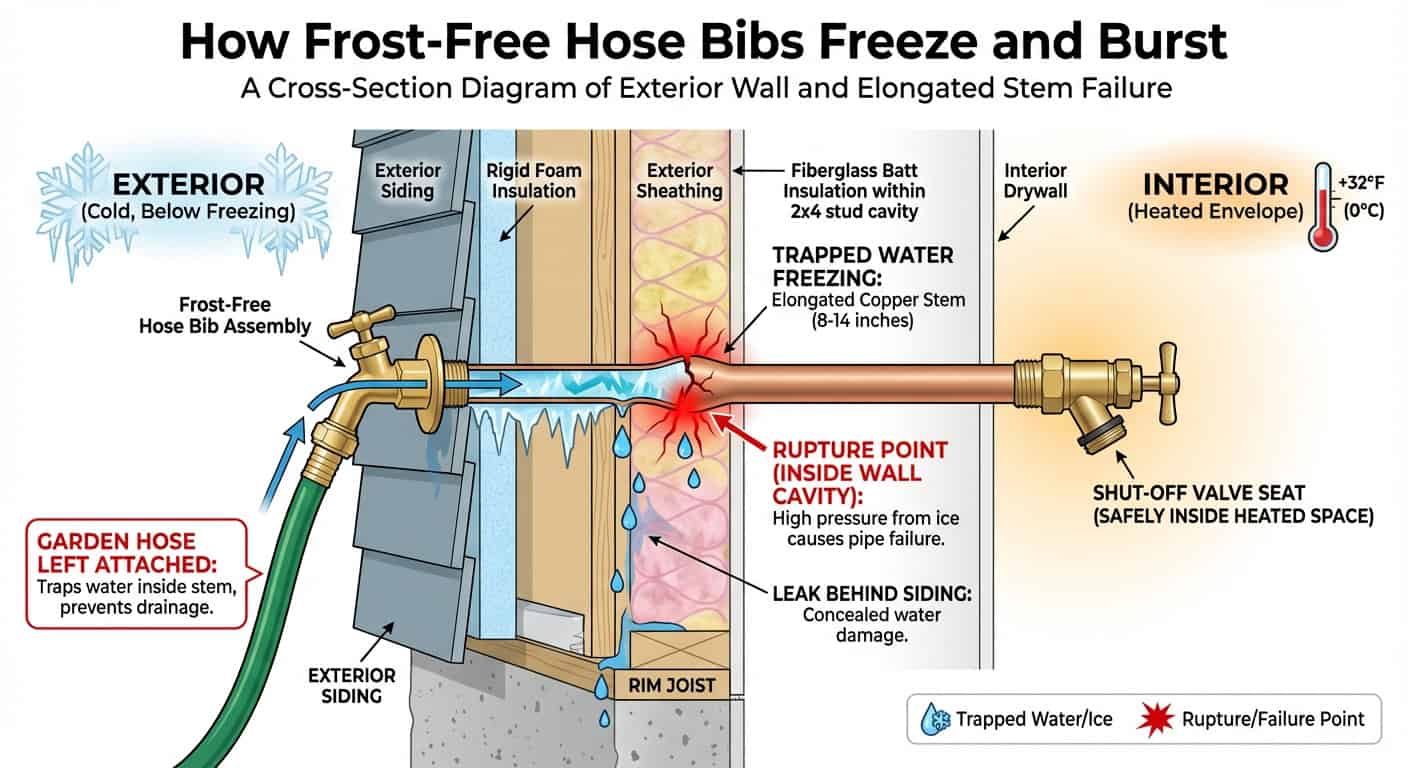
The fatal mistake that triggers these hidden disasters is leaving a garden hose attached during winter. When a hose remains connected, it traps water inside the stem. As temperatures drop below 32°F, that trapped water freezes and expands by approximately 9%, generating thousands of pounds of pressure per square inch. This tremendous force splits the copper tubing behind your wall, often at connection points or along weak spots in the pipe.
This is why standard winterization advice falls short. Most plumbing blogs focus exclusively on November prevention tips: “disconnect your hoses before the first freeze.” While that advice is sound, it doesn’t help homeowners who are facing the diagnostic phase right now in spring—those who suspect something is wrong but don’t know how to confirm it or what to do next.
Why Portland & Vancouver Homeowners Face Unique Freeze-Thaw Risks
The Pacific Northwest’s geography creates a perfect storm for plumbing failures that homeowners in more predictable climates rarely encounter. The Columbia River Gorge acts as a natural wind tunnel for Arctic air masses traveling south from Canada. When these cold fronts collide with the region’s typically mild maritime climate, the result is sudden, severe temperature drops that catch PNW homeowners off-guard. Unlike the Midwest, which settles into a consistent deep freeze from December through February, the Portland and Vancouver area experiences volatile temperature swings that make winterization timing nearly impossible to predict. The region’s “false spring” phenomenon is particularly treacherous. Mild weather in late February often prompts homeowners to start spring cleanup, reconnect hoses, and resume outdoor water use—only for mid-March freezes to cause ruptures in plumbing that seemed perfectly functional just days earlier. Recent climate data illustrates this volatility. The January 2024 ice storm that paralyzed the Portland/Vancouver metro brought wind chills into single digits and resulted in widespread infrastructure damage, including countless residential plumbing failures. Yet just three weeks later, temperatures climbed into the 50s, creating the false impression that winter had passed. Many outdoor faucet ruptures occur between mid-February and early April—precisely when homeowners believe winter is over but before they’ve tested their outdoor faucets. This timing means the leak remains hidden during the critical weeks when structural damage accelerates exponentially. While national statistics show water damage accounts for 20% of homeowners insurance claims with average costs exceeding $12,500, the Pacific Northwest’s freeze-thaw cycles intensify this risk. The region experiences more freeze-thaw transitions per winter than consistently cold climates, and each cycle stresses plumbing fixtures in ways that homeowners often underestimate until it’s too late.
How to Spot a Hidden Hose Bib Leak Before It Causes Thousands in Damage
The good news: Hidden hose bib leaks produce telltale warning signs if you know what to look for. Here are five indicators you can check today to determine if your outdoor faucet is compromised.
1. Reduced Water Pressure at the Spout
When you turn on your outdoor faucet, does water trickle weakly rather than flowing with strong, consistent pressure? This is often the first sign of trouble. When a hose bib ruptures inside your wall, water pressure diverts to the leak point rather than reaching the spout. The water is still flowing—it’s just flowing into your wall cavity instead of out where you can see it.
2. The “Thumb Test” Failure
Here’s a simple diagnostic you can perform in 30 seconds: Turn on the outdoor faucet and place your thumb firmly over the spout opening, attempting to block the water flow completely. Under normal conditions, you should struggle to hold back the full pressure—the water should feel forceful and difficult to contain. If you can easily block the flow with minimal effort, water is escaping elsewhere. This test works because intact plumbing should deliver enough pressure to overcome your thumb’s resistance. When a leak diverts that pressure internally, the outward flow becomes weak and controllable.
3. Visible Water Damage on Exterior Siding or Foundation
Walk around your home’s exterior and carefully inspect the area around each outdoor faucet. Look for:
- Water stains or discoloration on siding panels below the faucet
- Moisture seeping from between siding seams
- Wet or muddy soil against your foundation that doesn’t dry out, even during dry weather
- Rust stains on concrete or foundation walls
- Peeling or bubbling exterior paint near the faucet location
These exterior signs often appear before interior damage becomes visible, making them valuable early warning indicators.
4. Interior Wall Signs: Drywall Discoloration or Soft Spots
Check the interior wall directly behind your outdoor faucet location. In most homes, you’ll find the corresponding interior wall in a bathroom, kitchen, utility room, or basement. Warning signs include:
- Yellow or brown water stains on drywall or plaster
- Soft, spongy texture when you press against the wall
- Bubbling or peeling paint or wallpaper
- Visible mold growth (often appears as black or green spots)
- A persistent musty odor
5. Unexplained Spike in Water Bills
A fully opened ruptured hose bib running continuously can waste up to 7,200 gallons per day—that’s 5 gallons per minute multiplied by 1,440 minutes in a day. While most hidden leaks don’t run at full flow constantly, even a significant drip can add hundreds of gallons to your monthly water consumption. Compare your current and recent water bills to the same months in previous years. A sudden, unexplained increase—especially if your household water usage habits haven’t changed—often indicates a hidden leak somewhere in your plumbing system.

The chart above illustrates a crucial reality: The most expensive plumbing leaks are often the ones you can’t see or hear. A dripping kitchen faucet announces itself immediately and costs pennies to repair. A burst frost-free hose bib behind your wall remains silent for months while causing thousands in structural damage.
When DIY Detection Isn’t Enough: Advanced Leak Detection Methods
While the DIY tests above can confirm that a leak exists, they often can’t pinpoint where the rupture occurred or reveal the full extent of hidden damage. This is where professional leak detection technology becomes invaluable.
DIY Tests You Can Perform Today
The Water Meter Test This test helps determine if water is escaping between your meter and a closed fixture:
- Turn off all water-using appliances inside your home (dishwasher, washing machine, all faucets, toilets)
- Go to your outdoor faucet and turn it on, but keep the nozzle opening closed
- Locate your municipal water meter (usually in a ground box near the street or in your basement)
- Watch the meter’s low-flow indicator—typically a small triangle or circular dial
If the indicator is moving while everything is supposedly off and closed, water is leaking somewhere between the meter and your closed nozzle. The leak could be at the hose bib rupture point or along the supply line. The Extended Flow Test Run your outdoor faucet continuously for five minutes while carefully observing:
- The exterior wall area around the faucet for any moisture appearing on siding
- The ground below the faucet for wet spots that don’t correspond to water coming from the spout
- The interior wall behind the faucet for any temperature changes, moisture, or new stains
Take photos before and after the test to document any changes that develop.
Professional Leak Detection: The Sarkinen Plumbing Advantage
When DIY diagnostics suggest a problem but can’t define its scope, professional leak detection technology provides surgical precision without destructive exploratory demolition. Acoustic Leak Detection Professional plumbers use highly sensitive electronic listening devices—essentially medical-grade stethoscopes designed for plumbing—to detect the high-frequency hiss of pressurized water escaping through a rupture. These tools can pinpoint the exact location of a leak within inches, even when it’s buried behind drywall, insulation, and vapor barriers. The acoustic signature of a pressurized water leak is distinctive and unmistakable to trained technicians. This technology allows Sarkinen Plumbing to mark the precise rupture point on your wall, enabling targeted repairs that minimize drywall removal and restoration costs. Infrared Thermal Imaging Thermal imaging cameras detect temperature differentials behind building materials by measuring infrared radiation. When water saturates insulation behind drywall, it creates a distinct “cold spot” that shows up as a darker area on the thermal image. This technology is particularly valuable for:
- Mapping the full extent of water intrusion (not just the rupture point, but everywhere the water has traveled)
- Identifying hidden moisture before visible damage appears
- Detecting early-stage problems that haven’t yet caused staining or structural damage
- Documenting the scope of damage for insurance claims
A “blooming cold spot” radiating outward from an exterior wall is a classic thermal signature of an active hose bib leak saturating wall insulation.
The Cost-Benefit Reality
DIY testing has limitations: It can tell you if something is wrong, but rarely where or how severe the problem is. This uncertainty often leads homeowners to cut open large sections of drywall in a trial-and-error search for the leak source. Professional leak detection provides precision that saves money in three ways:
- Minimizes demolition: Knowing exactly where to cut means less drywall removal and lower restoration costs
- Speeds repairs: No guesswork means faster fixes and less water damage accumulation
- Prevents over-repair: Understanding the true scope prevents unnecessary work on unaffected areas
Professional Leak Detection Available
If your DIY tests suggest a hidden leak, Sarkinen Plumbing’s leak detection specialists can pinpoint the problem in one visit, providing you with a clear diagnosis and accurate repair estimate.
From $200 Repair to $8,000 Disaster: Why Early Detection Matters
The financial difference between catching a hose bib leak early versus discovering it months later isn’t measured in hundreds of dollars—it’s measured in thousands.
The Damage Timeline
Understanding how hidden water damage progresses helps explain why early detection is so critical:
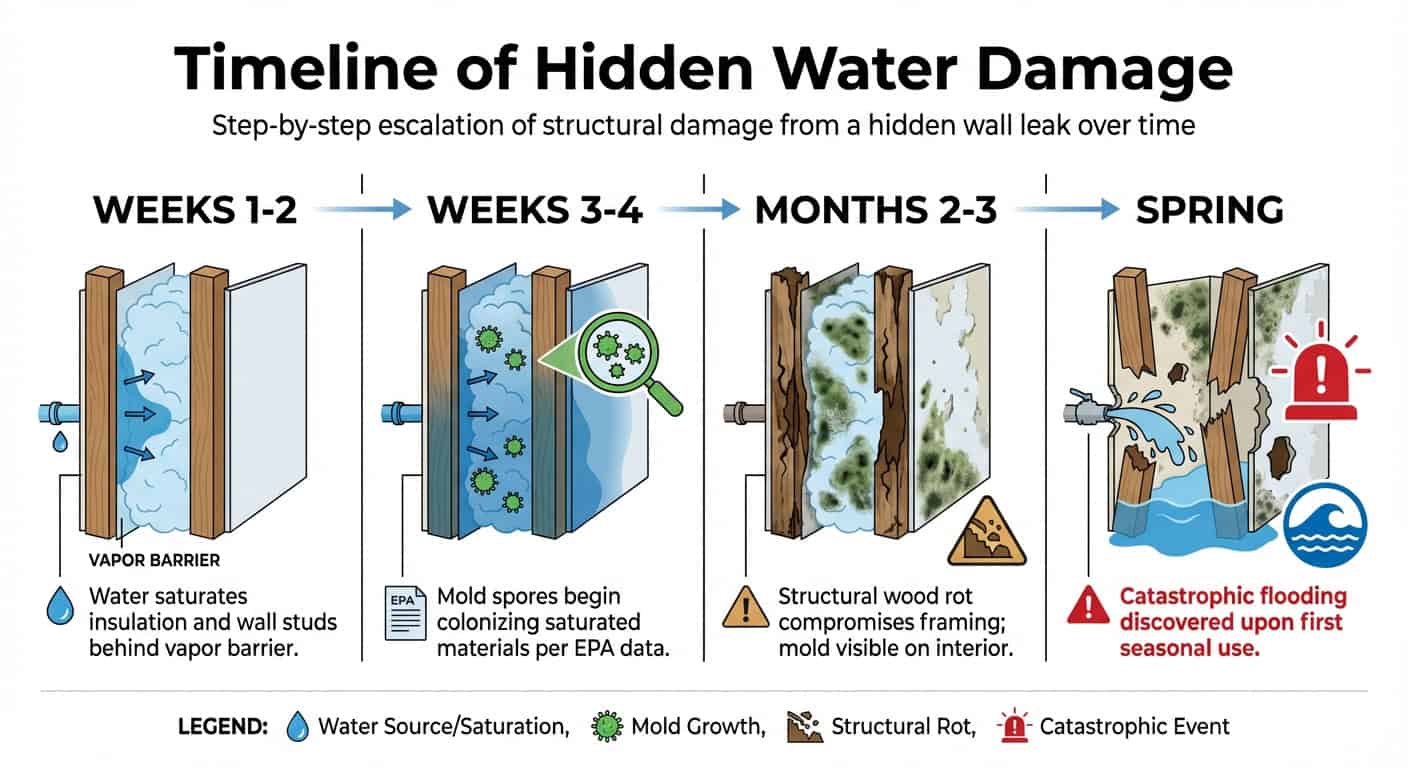
Week 1-2: Silent Saturation
Water escaping from the ruptured pipe saturates fiberglass or cellulose insulation within the wall cavity. The vapor barrier traps moisture against the back of the drywall and structural studs. At this stage, damage is invisible from both inside and outside the home. Week 3-4: Biological Invasion
Mold spores—which are present in virtually all indoor environments—begin colonizing the saturated building materials. Mold can establish itself on wet drywall, wood studs, and insulation within 24 to 48 hours of moisture exposure. During this phase, musty odors may become noticeable, but visible mold hasn’t yet appeared. Month 2-3: Structural Compromise
Prolonged moisture exposure causes wood rot in structural framing. Drywall begins to deteriorate, becoming soft and discolored. Mold growth becomes visible on interior walls. Paint bubbles and peels. The structural integrity of wall framing is compromised. Spring Discovery: The Catastrophic Reveal
The homeowner turns on the outdoor faucet for spring gardening and discovers dramatically reduced water pressure, visible interior wall damage, or water actively seeping from siding. By this point, the leak has been active for 3-5 months, and the damage scope is extensive.
Financial Impact Statistics
The Insurance Information Institute reports that water damage and freezing account for nearly 20% of all homeowners insurance claims, with average claim costs exceeding $12,500. But averages don’t tell the full story—hidden hose bib leaks often fall into the higher end of that spectrum. A typical hidden hose bib leak repair involves:
| Repair Component | Cost Range |
|---|---|
| Drywall removal and replacement | $800 – $1,500 |
| Insulation replacement | $400 – $800 |
| Hose bib replacement | $200 – $400 |
| Mold remediation (if delayed) | $2,000 – $6,000+ |
| Structural wood repair | $1,000 – $3,000 |
Case Study: The Clark County “False Spring” Flood
A Vancouver, Washington homeowner experienced firsthand how quickly costs escalate when hidden leaks go undetected. The Scenario: During an unseasonably warm late February, the homeowner attached a garden hose to wash their car, then left it connected. An early March cold snap brought overnight temperatures into the teens, causing the internal sillcock tube to split behind the exterior wall. The Event: In late April, confident that winter was over, the homeowner turned on the hose bib and ran a lawn sprinkler for 45 minutes. Because the rupture occurred deep in the wall cavity behind the vapor barrier, water flooded the wall interior and pooled into the finished basement below. Detection & Resolution: Sarkinen Plumbing technicians used thermal imaging to trace the full extent of moisture intrusion. The thermal scan revealed a “plume” of cold moisture extending four feet along the wall from the rupture point. Drywall had to be removed from both the exterior wall and basement ceiling. Insulation was completely saturated and had to be replaced. The split sillcock required replacement along with repairs to water-damaged basement finishing. Total Cost: $8,000 in remediation work, including plumbing repair, drywall replacement, insulation, painting, and basement repairs. The Lesson: Had the homeowner performed a simple flow-test before running the sprinkler—turning on the water and checking for normal pressure at the spout—the problem would have been immediately apparent. Shutting off the water after 30 seconds instead of 45 minutes would have prevented 99% of the damage.
The Insurance Consideration
Many homeowners insurance policies cover “sudden and accidental” water damage but specifically exclude gradual leaks resulting from “lack of maintenance.” If an insurance adjuster determines that a hose bib leak was longstanding and could have been detected earlier with reasonable diligence, your claim may be denied or significantly reduced. Early detection isn’t just about saving money on repairs—it’s about ensuring your insurance coverage applies when you need it most.
Your Spring Outdoor Faucet Maintenance Checklist (5 Minutes Can Save Thousands)
Prevention and early detection work hand-in-hand. Follow this simple five-step checklist every spring to protect your home from hidden hose bib leaks.
Step 1: Early April Inspection (Before First Use)
Before turning on your outdoor faucet for the first time since fall, conduct a visual inspection:
- Examine the faucet exterior for cracks, corrosion, or frost damage
- Check surrounding siding and foundation for water stains or damage
- Look for ice damage to the faucet handle or spout
- Verify that no hoses are currently attached
This 60-second inspection often reveals obvious damage that would cause immediate problems when water is turned on.
Step 2: Slow Opening Protocol
When you’re ready to test the faucet, turn it on slowly rather than opening it fully all at once. As water begins to flow:
- Listen for unusual hissing sounds that might indicate escaping water
- Watch for water appearing anywhere other than the spout
- Note the strength and consistency of flow
- Check pressure using the thumb test described earlier
If anything seems abnormal—weak pressure, strange sounds, or visible leaks—shut off the water immediately and contact Sarkinen Plumbing for a professional assessment.
Step 3: The 30-Second Thumb Test
Perform the pressure test described in the warning signs section:
- Turn the faucet fully open
- Place your thumb firmly over the spout
- Attempt to block the water flow
You should feel strong resistance—the water pressure should make it difficult to maintain a complete seal. If you can easily hold back the flow, water is likely escaping through a hidden leak.
Step 4: Interior Wall Check
After running your outdoor faucet for 2-3 minutes, go inside and inspect the interior wall directly behind the fixture. Check for:
- New moisture or dampness
- Temperature changes (feel for cold spots with your hand)
- Musty or mildew odors
- Any visible water stains or discoloration
If you notice any of these signs, shut off the outdoor faucet and schedule a professional leak detection assessment.
Step 5: November Winterization (Closing the Prevention Cycle)
When fall arrives and nighttime temperatures begin dropping below freezing, it’s time to protect your outdoor faucets:
- Disconnect ALL hoses before the first hard freeze—this is the single most important preventive step
- If you have an interior shut-off valve for your outdoor faucet, close it and open the exterior faucet to drain the line
- Consider installing a vacuum breaker cap for additional freeze protection
- Store hoses in a garage or shed where they won’t accidentally be reconnected during winter
Professional Maintenance Option
For homeowners who want comprehensive peace of mind, Sarkinen Plumbing offers seasonal plumbing inspections that include:
- Professional testing of all outdoor faucets and hose bibs
- Whole-home leak assessment using acoustic and thermal technology
- Preventative maintenance on vulnerable fixtures
- Weatherization recommendations specific to your home’s plumbing configuration
Schedule Your Spring Plumbing Checkup
Our technicians will test all outdoor faucets and identify potential issues before they become expensive emergencies.
Key Takeaways
As spring gardening season begins, take five minutes to test your outdoor faucets before connecting your hose. If you notice any warning signs—weak pressure, water stains, unusual sounds, or interior wall changes—don’t wait. Hidden leaks cause exponentially more damage with each passing week. Concerned about a potential hidden leak? Sarkinen Plumbing’s leak detection specialists serve Portland and Vancouver with same-day emergency service and upfront pricing. Call (360) 369-3586 or schedule online for a professional diagnostic assessment. Protect your home’s structural integrity before a small leak becomes a major disaster.
References:
- U.S. Department of Housing and Urban Development (HUD). (2022). Winterizing Your Home: Frost-Free Faucets. https://www.huduser.gov/portal/publications/destech/winter.html
- U.S. Department of Energy. (2023). Weatherize Your Home. https://www.energy.gov/energysaver/weatherize
- National Weather Service (NWS). (2024). Climate Data and Past Weather Events – Portland/Vancouver. https://www.weather.gov/pqr/climate
- U.S. Department of Energy, Building Technologies Office. (2023). Thermal Imaging for Building Diagnostics. https://www.energy.gov/eere/buildings/articles/thermal-imaging-building-diagnostics
- U.S. Environmental Protection Agency (EPA). (2024). Fix a Leak Week: Statistics and Facts. https://www.epa.gov/watersense/fix-leak-week
- Insurance Information Institute (III). (2023). Facts + Statistics: Homeowners and renters insurance. https://www.iii.org/fact-statistic/facts-statistics-homeowners-and-renters-insurance
- U.S. Environmental Protection Agency (EPA). (2023). Mold Course Chapter 1: Mold Basics. https://www.epa.gov/mold/mold-course-chapter-1
- Federal Emergency Management Agency (FEMA). (2023). Building Science Branch: Moisture Control. https://www.fema.gov/emergency-managers/risk-management/building-science
- Vancouver 360-369-3586
- Portland 503-925-3504


Vancouver Location
Proudly Serving
Portland and Vancouver
from Wilsonville to Longview &
Hillsboro to Gresham
UBI # 602-521-027
OR Contractor Lic# 170052 (CCB)
WA Contractor Lic# SARKIPI946MF
OR Plumber Lic# PB115
Customer Satisfaction
4.6 stars - Based on 227 Reviews
![]()


Quick Links
Plumbing Services
SW Washington Service Areas
Oregon Service Areas
Contact Information
Sarkinen PlumbingVancouver
9502 NE 72nd Ave
Vancouver, WA 98665
Phone: 360-369-3586
Portland
Phone: 503-925-3504
Hours of Operation
Monday - Sunday 24-hours