- Vancouver 360-369-3586
- Portland 503-925-3504

Unexplained High Water Bill? Here’s How to Troubleshoot a Hidden Leak
by writer | Dec 31, 2025
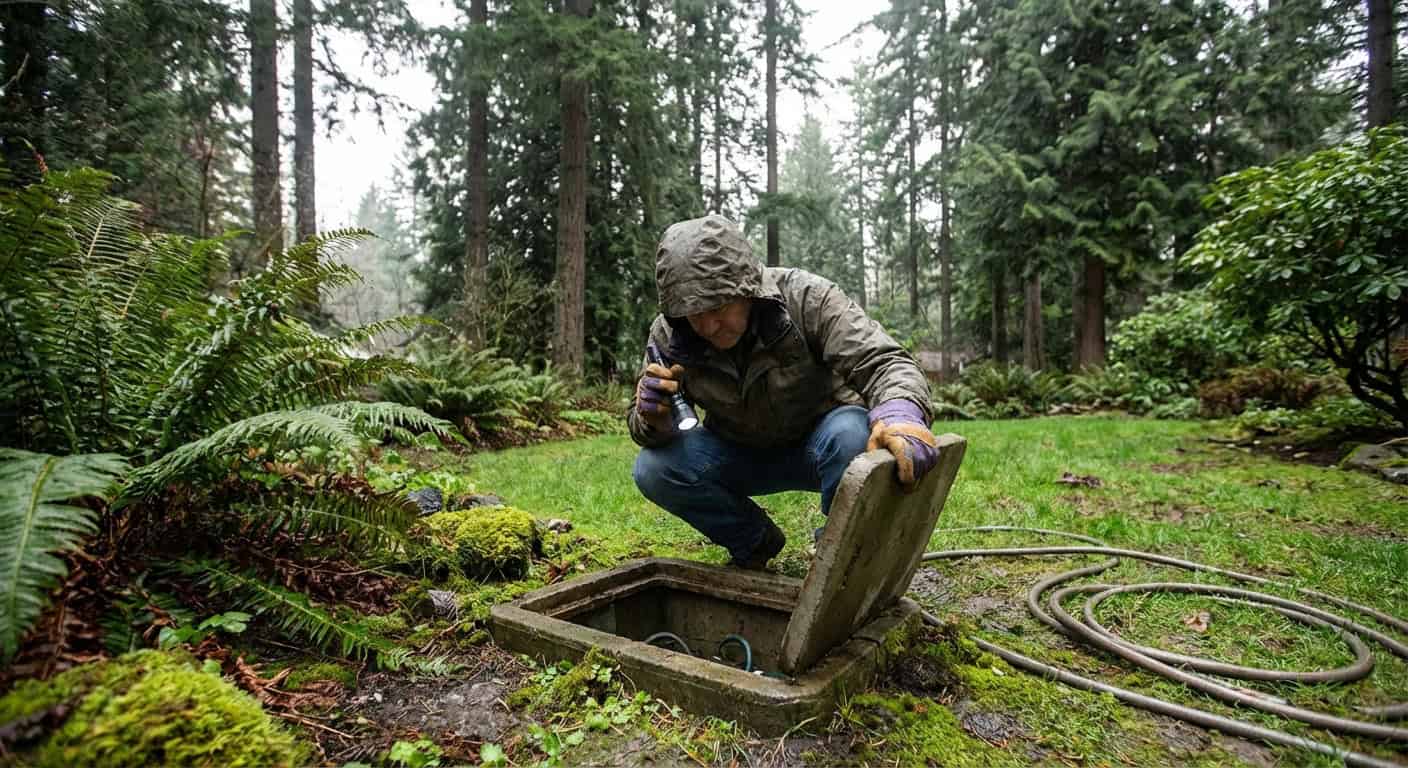
Table of Contents
- A Dripping Faucet Doesn’t Sound Expensive—Until You Do the Math
- How to Use Your Water Meter to Confirm a Leak in 30 Minutes (No Tools Required)
- Where’s the Leak? How to Narrow Down the Search Before Calling a Pro
- The Hidden Threats: Why Older Portland & Vancouver Homes Are Leak-Prone
- You’ve Confirmed the Leak—Now What? When to Call Sarkinen Plumbing
- Key Takeaways
You open your water bill and see $150 more than usual—but you haven’t filled a pool, watered the lawn excessively, or changed your habits. What’s going on? For thousands of homeowners in Portland and Vancouver, this scenario plays out every month. The culprit? Hidden leaks that silently drain both your wallet and precious water resources. According to the EPA WaterSense program, the average household wastes 10,000 gallons annually due to leaks. Even more alarming, 10% of homes waste 90+ gallons per day—water you’re paying for without ever using it. Here in the Pacific Northwest, the financial pain is doubled. Portland and Vancouver residents don’t just pay for the wasted water; they also pay sewer processing charges calculated from their water meter readings. That means a hidden leak hits you with a “double penalty”—you’re charged for water that never reached your faucet and for treating it as sewage. The good news? Before you pick up the phone to call a plumber, there’s a simple, free diagnostic tool that can definitively tell you whether a leak exists: your water meter. This guide will walk you through using your water meter to detect leaks, isolate the problem area, and decide when it’s time to bring in professional help from Sarkinen Plumbing.
A Dripping Faucet Doesn’t Sound Expensive—Until You Do the Math
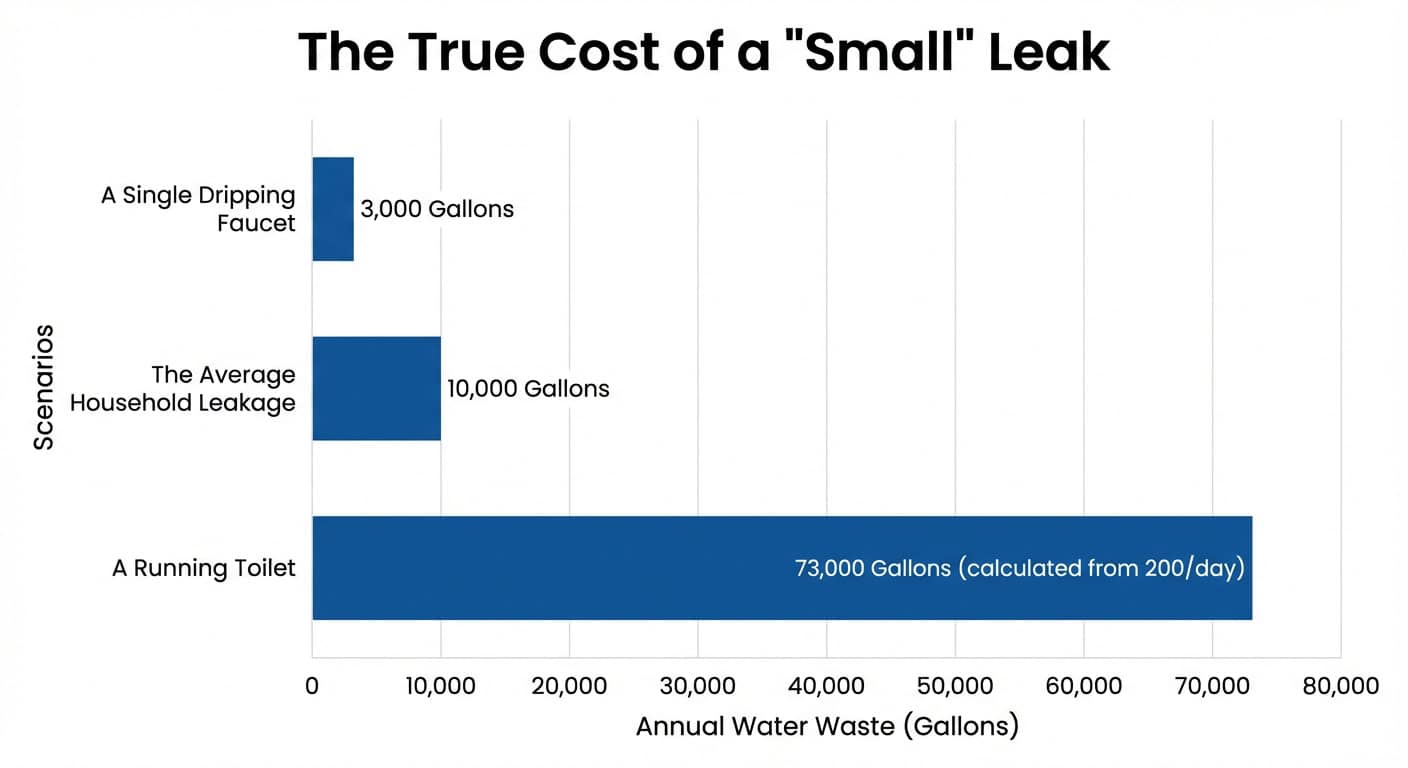
Most homeowners dismiss small leaks as minor annoyances. A slow drip here, a running toilet there—how much could it really cost? The answer might shock you. The Drip: A single faucet dripping just once per second wastes 3,000 gallons per year. In Portland’s tiered rate structure, where water costs increase with usage, this seemingly insignificant drip could add $30–$50 annually to your bill. Multiply that by multiple fixtures, and the cost escalates quickly. The Running Toilet: Here’s where things get serious. A toilet with a failing flapper valve can silently waste 200 gallons per day—that’s 6,000 gallons monthly. Because Portland calculates sewer charges based on water consumption, this single malfunctioning toilet could inflate your combined water and sewer bill by $100 or more each month. Over a year, you’re looking at over $1,200 in wasted money. The Underground Main Leak: The most insidious leaks occur where you can’t see them. A fractured service line running between the street and your home can lose hundreds of gallons daily without creating visible puddles—especially here in the rainy Pacific Northwest, where saturated ground naturally masks the symptoms. These leaks can run for months undetected, costing thousands in excess charges. Vancouver homeowners face a similar financial squeeze. The city’s tiered rate structure means a hidden leak doesn’t just waste water at a flat rate—it pushes your total consumption into higher pricing tiers, exponentially increasing costs regardless of your intentional usage.
How to Use Your Water Meter to Confirm a Leak in 30 Minutes (No Tools Required)
Your water meter is the single most reliable leak detector on your property. Unlike inspecting individual fixtures—which can miss hidden problems—the meter measures all water entering your home. If water is moving through that meter when nothing should be running, you have a leak. Period.
Understanding Your Meter
Portland and Vancouver homeowners typically have one of two meter types: Analog Meters: These mechanical devices feature a sweep hand (like a clock) and a small indicator called the “low-flow indicator.” This indicator—usually shaped like a triangle, star, or gear—will spin even with minimal water flow, making it incredibly sensitive to leaks. Digital AMI Meters: Modern smart meters display numbers on an LCD screen. Many include a dedicated “leak icon” (often shaped like a dripping faucet) that flashes when continuous water flow is detected over 24 hours. If you see this icon, you almost certainly have a leak.
The Step-by-Step Water Meter Test
This simple protocol will definitively confirm whether a leak exists on your property: Step 1: Shut Off All Water Use
Turn off every faucet, shower, and appliance that uses water. This includes dishwashers, washing machines, and automatic ice makers. Deactivate irrigation systems. Most importantly, do not flush any toilets during the test—toilet tank refills can mask meter readings. Step 2: Locate Your Meter
In the Pacific Northwest, water meters are typically housed in concrete or plastic boxes near the street curb. Look for a lid marked “Water” or “Water Meter.” You may need a flat tool to pry open the cover. Once open, you should see your meter inside. Step 3: Record the Baseline Reading For Analog Meters: Note the exact position of the sweep hand—many homeowners place a piece of tape on the face to mark the position. More importantly, watch the low-flow indicator for 1-2 minutes. Is it spinning or stationary? For Digital Meters: Write down the displayed number exactly. Check if a leak icon is flashing on the screen. Step 4: Wait 15-30 Minutes
This is the hardest part—do absolutely nothing. Don’t use any water. If you’re worried family members might use water, consider leaving the house. The longer you wait (up to an hour), the more definitive your results will be. Step 5: Check Again For Analog Meters: Has the sweep hand moved from your tape mark? Is the low-flow indicator spinning? If either answer is yes, you have confirmed a leak. For Digital Meters: Has the number increased? Is the leak icon flashing? If yes to either question, you have confirmed a leak.
Interpreting Your Results
| Meter Behavior | What It Means | Next Step |
|---|---|---|
| No movement; low-flow indicator stationary | No active leak detected | Recheck during different times of day (some leaks are intermittent, particularly irrigation valves). |
| Low-flow indicator spinning; numbers increasing | Confirmed leak on your property | Proceed to the next section to isolate the location. |
| Leak icon flashing (digital meter) | Continuous flow detected over 24 hours | Immediate action required—this indicates a significant leak. |
If your meter confirms a leak but you can’t find it indoors, the problem may be in your underground service line—a job best handled by professionals like Sarkinen Plumbing. Keep reading to learn how to narrow down the search area.
Where’s the Leak? How to Narrow Down the Search Before Calling a Pro
You’ve confirmed a leak exists. Now comes the detective work: Is the problem inside your home or buried underground? This critical distinction will determine whether you can handle the repair yourself or need professional excavation and detection services.
The Main Shutoff Valve Test
Your home’s main water shutoff valve is the key to isolating the leak’s location. This valve controls all water entering your house and is typically located in one of these spots:
- Garage wall (where the service line enters)
- Basement near the water heater
- Crawl space entrance
- Utility room
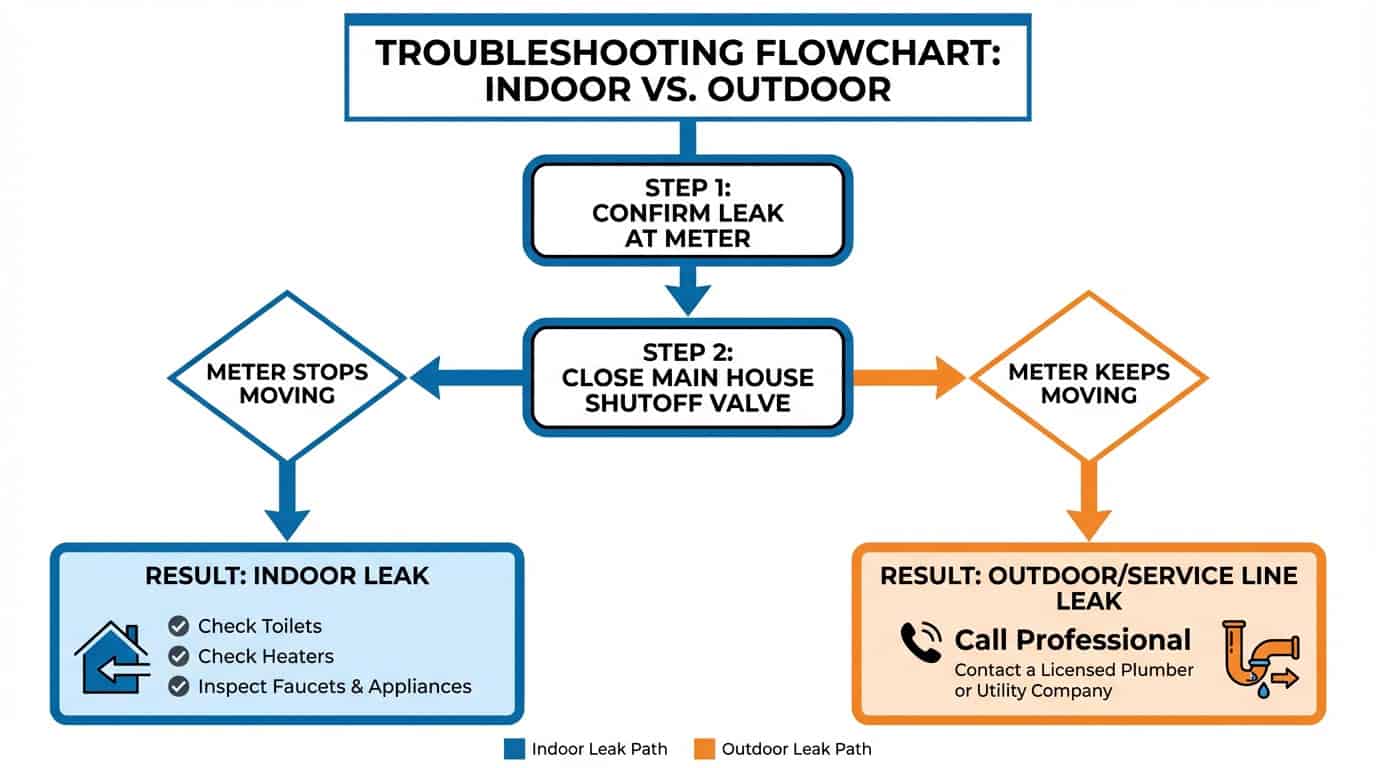
Here’s the isolation protocol: Step 1: Locate and turn your main shutoff valve to the “OFF” position. Turn it clockwise until it stops. Step 2: Return to your water meter at the curb. Step 3: Observe the meter for 5-10 minutes:
- Scenario A: Meter stops moving → Leak is inside your house (after the shutoff valve)
- Scenario B: Meter continues moving → Leak is in the underground service line between the street and your home
Indoor Leak Culprits
If your main shutoff test indicates an indoor leak, here are the most common sources: Toilets (The #1 Offender): Toilet leaks are silent and incredibly wasteful. A degraded rubber flapper allows water to seep continuously from the tank into the bowl without making the running sound of a “phantom flush.”
Water Heater Relief Valves: The Temperature & Pressure (T&P) relief valve on your water heater may develop slow leaks that drain into a pipe rather than creating a visible puddle on the floor. Check for moisture around this valve and the connected drain line. If you need professional assistance, Sarkinen Plumbing offers water heater repair services. Under-Sink Shutoff Valves: The compression fittings on shutoff valves under sinks and toilets can develop slow drips into cabinets, especially in older homes. Open these cabinets during your leak investigation and check for moisture, water stains, or warped wood.
Outdoor and Underground Leak Indicators
If the meter continues moving with the main valve off, the leak is in your underground service line. Here’s what to look for: Soggy Spots in the Yard: In drier climates, an underground leak creates obvious wet patches. In the Pacific Northwest, constant rainfall makes this symptom nearly impossible to detect—which is exactly why the water meter test is so critical here. Cracked Driveway or Foundation Settling: Severe service line leaks cause soil erosion beneath driveways and foundations, leading to visible cracks or settling. If you notice new cracks accompanied by a confirmed meter leak, this is a serious situation requiring immediate professional attention. Sarkinen Plumbing provides main water line repair services for these situations. Hissing Sounds Near the Meter: With all indoor water off, stand near your meter. If you hear water moving or a faint hissing sound, the leak is close to the street connection—likely in the first section of your service line.
The Hidden Threats: Why Older Portland & Vancouver Homes Are Leak-Prone
Understanding why Pacific Northwest homes experience leaks helps you assess your property’s risk level. Our region’s housing stock contains specific plumbing materials that have proven problematic over time, combined with environmental factors that accelerate pipe failure.
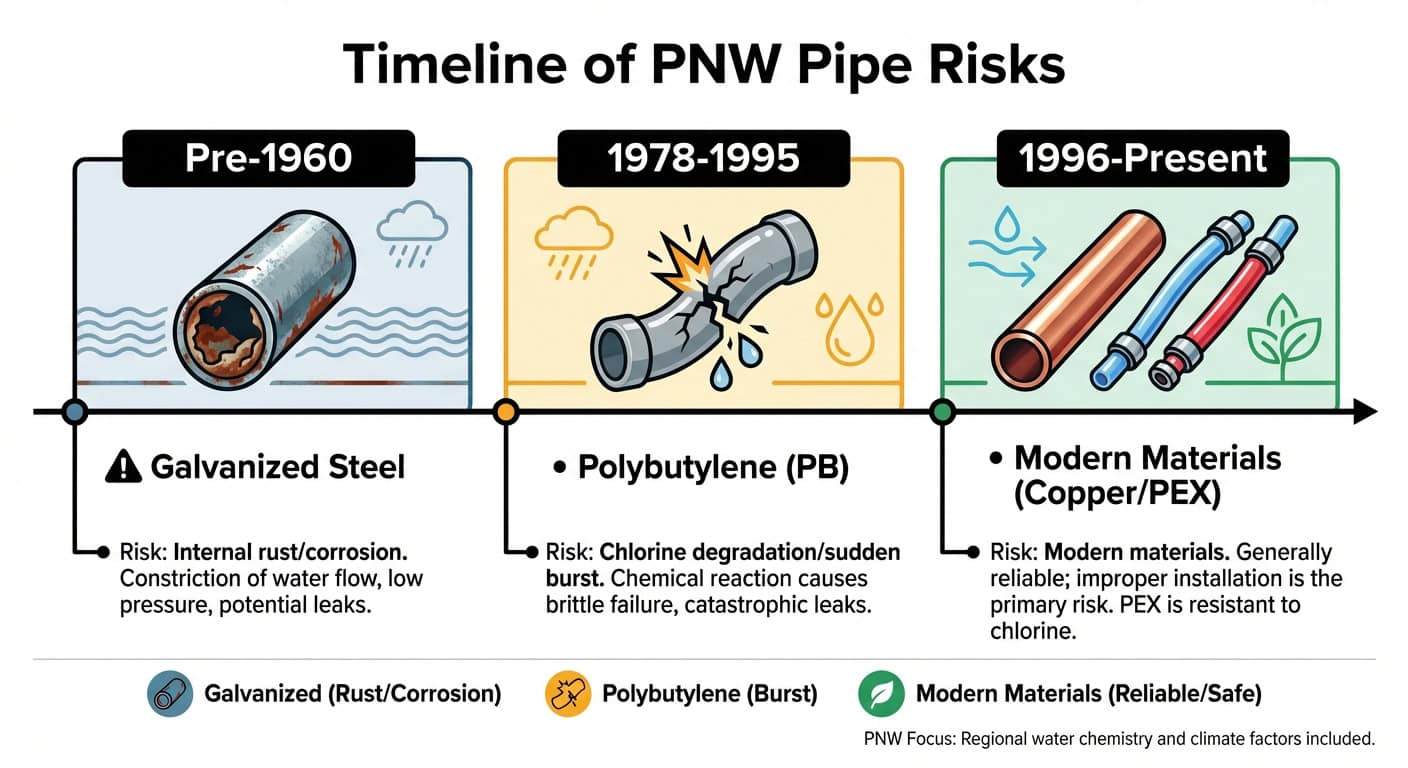
Polybutylene Piping (1978-1995): The “Blue Pipe” Disaster
If your Portland or Vancouver home was built during this era, you may be living with a ticking time bomb. Polybutylene pipes—marketed as “the pipe of the future”—turned out to be anything but. These gray or blue plastic pipes react with chlorine in municipal water, causing them to degrade from the inside out. The failure pattern is particularly insidious: the pipes become brittle over 15-30 years, then fail suddenly and catastrophically, often at joints and connections. A Polybutylene failure in a crawl space can flood your home with hundreds of gallons before you discover it. If you have Polybutylene, we strongly recommend scheduling a whole-home replumb consultation with Sarkinen Plumbing. While replacement represents a significant investment, it’s far less expensive than dealing with water damage, mold remediation, and emergency repairs after a catastrophic failure.
Galvanized Steel (Pre-1960s Homes): Rust from Within
Older Portland neighborhoods like Irvington, Alameda, and Laurelhurst contain beautiful historic homes—many with original galvanized steel plumbing. These pipes corrode from the inside out, with rust buildup gradually restricting water flow and creating weak spots that develop into pinhole leaks. Telltale Symptoms:
- Rusty or discolored water when faucets are first turned on
- Reduced water pressure throughout the home
- Frequent pinhole leaks at threaded joints
If your pre-1960s home still has galvanized pipes, you’re not just facing individual leak repairs—you’re looking at eventual whole-home repiping. Sarkinen Plumbing can assess your pipe condition and develop a replacement timeline that fits your budget.
Environmental Factors Unique to the Pacific Northwest
Tree Root Intrusion: Our region’s lush vegetation is beautiful but poses a constant threat to underground service lines. Tree roots naturally seek moisture and can infiltrate older clay sewer pipes or compromise PVC water lines through pressure and soil shifting. Once inside a pipe, roots create blockages and accelerate fracture formation. The “Rain Camouflage” Effect: This is perhaps the most challenging aspect of leak detection in the Pacific Northwest. In Arizona or Southern California, an underground leak creates an obvious wet spot or puddle in the yard. Here, with frequent rainfall keeping the ground naturally saturated, even a significant underground leak remains invisible on the surface. This environmental factor makes the water meter test absolutely essential for PNW homeowners. You simply cannot rely on visual inspection to detect underground leaks in our climate.
Real-World Example: The Invisible Underground Leak
A Vancouver homeowner contacted Sarkinen Plumbing after seeing a $200 increase in their monthly water bill. They had performed the toilet dye test, checked all faucets, and found no indoor leaks. The yard showed no signs of flooding—understandably, given the constant winter rainfall.
The water meter test confirmed continuous flow. Using acoustic ground microphones, our technicians located a fractured main line three feet underground, caused by rock impingement (a sharp rock pressed against the pipe during soil settling). The leak had been running for approximately two months, wasting an estimated 12,000 gallons.
We completed a trenchless repair that preserved the driveway and landscaping, stopping the financial hemorrhage and preventing potential foundation damage from ongoing soil erosion. The homeowner’s bill returned to normal the following month, and the repair paid for itself in less than a year in avoided water charges.
You’ve Confirmed the Leak—Now What? When to Call Sarkinen Plumbing
The water meter test is powerful—but it has limits. It tells you definitively that a leak exists, but not precisely where. For accessible fixtures like toilets and faucets, visual inspection and simple tests suffice. For everything else, professional detection technology becomes necessary.
When DIY Reaches Its Limits
You can confirm a toilet leak with food coloring. You can spot a dripping faucet with your eyes. But DIY methods fail completely for: Slab Leaks: Homes built on concrete foundations may develop leaks in pipes encased within or beneath the slab. These leaks are completely inaccessible without detection equipment and often require specialized repair techniques. Deep Underground Service Lines: The pipe running from the street to your home typically sits 3-6 feet underground. Even if you know the leak is in this line (from the shutoff valve test), pinpointing the exact location without excavating your entire yard requires professional tools. Micro-Leaks in Crawl Spaces: A small leak in a crawl space might hide behind insulation, vapor barriers, or among floor joists. By the time it’s visually obvious, significant wood rot or mold growth may have occurred.
Professional Detection Technology
Sarkinen Plumbing employs advanced, non-destructive detection methods that locate leaks with pinpoint accuracy: Acoustic Listening Equipment: Water escaping under pressure creates a specific sound signature. Professional-grade ground microphones and amplification equipment allow us to detect this sound through concrete, soil, and other materials. This technology identifies leak locations within inches—not yards—preventing unnecessary exploratory demolition. Thermal Imaging Cameras: These specialized cameras detect temperature differentials caused by water accumulation. A hot water line leak beneath a slab creates a warm spot detectable by thermal imaging, while cold water leaks show as cool areas in wall cavities. Tracer Gas Detection: For the most elusive leaks, we can introduce an inert gas mixture (hydrogen/helium) into the plumbing system. Sensitive detectors then “sniff” for gas escaping at the breach point, even through several feet of soil or concrete.
Comparing Detection Capabilities
| Feature | DIY Investigation | Sarkinen Plumbing Detection |
|---|---|---|
| Primary Tools | Visual inspection, food dye, water meter | Acoustic listening, thermal imaging, tracer gas |
| Accuracy | Binary (leak/no leak); general area | Pinpoint location (within inches) |
| Invasiveness | Low (observation only) | Low (non-destructive testing before repair) |
| Best Application | Confirmed toilet leaks, dripping faucets | Slab leaks, underground mains, hidden micro-leaks |
Recognizing Slab Leak Warning Signs
If your home is built on a concrete foundation, watch for these red flags that suggest a slab leak:
- Warm spots on floors (indicates a hot water line breach beneath the slab)
- Mildew under carpets or along baseboards in rooms without obvious water sources
- Unexplained increase in indoor humidity, especially during dry seasons
- Cracking in walls or floors near plumbing fixtures (severe leaks cause soil erosion beneath the foundation)
- Sound of running water when all fixtures are off, seemingly coming from the floor
Slab leaks require immediate professional attention. Left unaddressed, they cause exponentially increasing damage—from minor moisture issues to major foundation compromise.
Key Takeaways
In just 30 minutes, you can use your water meter to confirm whether a leak exists—no plumber required for that first diagnostic step. This simple test has saved countless Pacific Northwest homeowners from months of escalating water bills while they searched for a leak they couldn’t find. But time matters. Every day a leak runs unaddressed, you’re paying for wasted water, phantom sewer charges calculated from that waste, and risking progressive structural damage. The water meter test is your early warning system—use it at the first sign of an unexplained bill increase. A high water bill is rarely a meter error or billing mistake. It’s a symptom of infrastructure failure. For Portland and Vancouver homeowners, understanding your property’s specific vulnerabilities—whether Polybutylene piping, corroded galvanized steel, or the invisible threat of underground leaks masked by constant rainfall—is the first step toward protection. Sarkinen Plumbing has served the Pacific Northwest for years, specializing in the unique challenges of our region’s aging housing stock and environmental conditions. We understand that a small investment in leak detection today prevents catastrophic damage tomorrow. Don’t let a hidden leak drain your wallet another day. Start with the water meter test. If you confirm a leak you can’t locate, we’re here with the technology and expertise to find it fast, fix it right, and get your water bill back to normal.
Ready to Stop the Leak?
Contact Sarkinen Plumbing for expert leak detection and repair in Portland and Vancouver. Our team uses advanced technology to pinpoint leaks without unnecessary demolition—saving you time and money.
References:
- U.S. Environmental Protection Agency (EPA). (2024). Fix a Leak Week & Facts on Leaks. https://www.epa.gov/watersense/fix-leak-week
- Alliance for Water Efficiency. (2023). Residential End Uses of Water Study. https://www.allianceforwaterefficiency.org/resources/residential
- Portland Water Bureau. (2024). Rates and Charges. https://www.portland.gov/water/pay-your-utility-bill/rates-charges
- City of Vancouver, Washington. (2024). Utility Rates and Fees. https://www.cityofvancouver.us/government/department/utility-billing-services/rates-and-fees/
- Smart Energy Consumer Collaborative. (2023). Understanding Smart Water Meters. https://smartenergycc.org/
- U.S. Geological Survey (USGS). (2023). Water Science School: Per Capita Water Use. https://www.usgs.gov/special-topics/water-science-school/science/water-use-home
- International Association of Certified Home Inspectors (InterNACHI). (2023). Polybutylene for Inspectors. https://www.nachi.org/polybutylene-pipes.htm
- General Services Administration (GSA). (2022). Plumbing Systems: Galvanized Iron and Steel. https://www.gsa.gov/real-estate/historic-preservation/historic-preservation-policy-tools/preservation-tools-resources/technical-procedures/plumbing-systems-galvanized-iron-and-steel
- Water Research Foundation. (2022). Leak Detection and Water Loss Control. https://www.waterrf.org/
- The Spruce. (2024). How to Find a Water Leak Underground. https://www.thespruce.com/how-to-find-underground-water-leaks-2718731
- International Association of Plumbing and Mechanical Officials (IAPMO). (2023). Plumbing Codes and Standards for Leak Detection. https://www.iapmo.org/
- American Water Works Association (AWWA). (2023). Controlling Water Loss in Distribution Systems. https://www.awwa.org/Resources-Tools/Resource-Topics/Water-Loss-Control
- Vancouver 360-369-3586
- Portland 503-925-3504


Vancouver Location
Proudly Serving
Portland and Vancouver
from Wilsonville to Longview &
Hillsboro to Gresham
UBI # 602-521-027
OR Contractor Lic# 170052 (CCB)
WA Contractor Lic# SARKIPI946MF
OR Plumber Lic# PB115
Customer Satisfaction
4.6 stars - Based on 227 Reviews
![]()


Quick Links
Plumbing Services
SW Washington Service Areas
Oregon Service Areas
Contact Information
Sarkinen PlumbingVancouver
9502 NE 72nd Ave
Vancouver, WA 98665
Phone: 360-369-3586
Portland
Phone: 503-925-3504
Hours of Operation
Monday - Sunday 24-hours